Case Study5E
© COPYRIGHT MMXXI CHROMOSPHERE. ALL RIGHTS RESERVED.

2D/3D HYBRID ANIMATION / 2021
CASE STUDY NAVIGATION:
PART 1: Origins / PART 2: A New Pipeline / PART 3: Designing for Unreal / PART 4: Layout / PART 5: Rigging & Animation / PART 6: The Look / PART 7: Effects & Conclusion
LOOK DEVELOPMENT
By far the biggest challenge for the team on this project was to figure out how we could create a final picture look in real-time which would live up to the look we were already creating on episodes 1 & 2 using AfterFX. Theresa worked closely with our Lead Compositor Stéphane Coëdel to understand his 2D process and figure out ways that we could create facsimile processes in Unreal.
THERESA LATZKO (Technical Art Director): I think we had to first find out if we can extract information in the same way to process it. The main thing that Stef does for compositing on Yuki is just extract a bunch of different render passes and process them in different ways and then slam them back together. With Unreal rendering everything in real time, the first order of operation is figuring out how much of that information we can actually access.
^ NORMALIZED VS. FULL RANGE LIGHTING INFORMATION
STÉPHANE COËDEL (Lead Compositor): I took Theresa through how I built the images in AfterFX, the look, and it’s clearly a different process in 2D. I use the different light passes that the CG artists render for me, and I would handle the light colors in After Effects. So this had to be treated differently in Unreal since everything is done in real-time. I explained to Theresa how I was proceeding so she could find different ways to have a similar result. Especially in the shadows, making sure they are never black but always tinted and with a bluish or sometimes purplish darkness.
^ EPISODE 2 COMPOSITING BREAKDOWN BY STÉPHANE
THERESA: There’s multiple ways of doing stylized toon shading in Unreal. One of them is that you hook directly into the material the objects have applied to them. And another one is post processing materials where you go and process the final image that comes in at the end. We pretty quickly opted towards the latter as we were trying to recreate that compositing workflow. And we don’t recreate the compositing 100% because of the workflow in Unreal being so different. But we process the lighting pass that we have in a multitude of different ways and crunch it into different contrasts which gets us similar results.
^ MOVING LIGHT IN UNREAL
Mid-way through the process, we decided to output some of the renders from Unreal so that Stéphane could take a pass at them in AfterFX, in the hopes that it would show us how much further we might still be able to push the post processing materials in Unreal.
^ COMPOSITING TEST SCENE BY STÉPHANE
STÉPHANE: When I did the compositing test, it was giving a lot of information to Theresa for her to know which areas we could enhance. This included things like the look of the specs on the surface of the water, the way the speed lines were applied and how the sunlight affects the lens as well. It was really interesting. I was on a lot of the calls where everyone was talking and everyone was using different tools to come up with different solutions to do things. But if you were able to demonstrate how you approach it in After Effects for example, it would get Theresa thinking somehow, like, “Oh, maybe I can do it this way in the tool that I’m using,” and she would come up with something. It seemed like she was opening doors to her brain to find different ways.
After months of development, we arrived at a post-processing look which captured what we were after. Theresa breaks down the post-process flow here:
^ YUKI 7 LIGHTING SYSTEM PROCESS BY THERESA
THERESA: The first step here is once we extract the lighting, we separate the whole scene into light and dark areas and start processing them separately. We also take the regular lighting and we blend it together with the texture color. This gives us a really nice baseline for the rest of the picture, because as soon as you dial in a little bit of that original texture color, things tend to get kind of more saturated and it helps you get away from this gray CG look. One of the next steps is if you have all these dominant texture colors, you risk losing the colors of the actual lights in the scene. So I added an ability to just amplify and bring back the colors of the actual light on top of the texture colors. This is really variable; you could use 100% texture colors for your starting point for a shot or you could use none of them and in practice we always ended up somewhere in the middle. This is pretty similar to how Stephane does it in compositing. It’s counter intuitive, because we just take the lighting away, and we end up with a flat picture. Then we multiply the lighting back on top of it, and it looks better that way.
^ DEFAULT UNREAL LOOK (BEFORE) VS. FINAL POST-PROCESSED LOOK (AFTER)
THERESA: The patterns were another thing stylistically that were pretty fairly established through comping already. A lot of that I just recreated in the shader. Originally we made the patterns procedurally, but we just ended up using textures for it in the end, because Stephane already had all these textures that he was using for his compositing. So we’re just using the exact same textures that he does. Theoretically, we can swap out the halftone & raster line patterns too.
^ REAL-TIME POST-PROCESSING ADJUSTMENTS
Once Theresa had established the post-processing look, it was up to CG Artist Andrew Wilson to go in and place lights and adjust the materials for every scene. Having also worked on episodes 1 & 2, Andrew was uniquely suited to the task.
ANDREW WILSON (CG Artist): Initially on episodes 1 & 2 of Yuki, I remember being very confused about what I was supposed to be doing exactly, mainly because I had no idea what the final product was going to look like. In our old process working in Maya, you’re basically working blind, where you have no idea what the lighting is going to add up to. I would be trying to sort of guess at what is going to happen to this thing once it all gets processed & composited, but there’s really no telling for sure. With the Unreal process, it was the first time where we could actually light it and see what the final image was gonna look like at the same time. That mixes the aspects of lighting and compositing into one system and makes it a lot easier to light as well as composite and see the final lighting look a lot quicker.
^ SCENE LIGHTING PROGRESSION BY ANDREW
THERESA: It’s worth mentioning how Andrew was actually making all these lighting adjustments. We had these material collections that hooked into all the post processing materials, and he just had a gigantic list of parameters accessible in Sequencer so that he could tweak them in the material per shot.
^ LIGHTING ATTRIBUTES LIST IN UNREAL SEQUENCER
ANDREW: Thanks to Theresa for making those color swatch materials that had plenty of parameters for me to play with in order to get something that looked good 🙂
OCEAN SURFACE
Theresa takes us through how she created the dazzling stylized water surface which is front and center for most of the episode:
THERESA: The ocean surface in Yuki, despite its multiple parallaxing layers, is a single material that gives off the illusion of depth and transparency, with some decorative elements added in post processing. Stephane came up with a proof of concept for the water surface look & detail in AE, and I based a lot of the final look on his take.
^ OCEAN COMPOSITING TEST BY STÉPHANE
^ FINAL OEAN LOOK BY THERESA LATZKO
The material is pretty complex and not all that optimized, but we’re rendering out the final picture frame by frame, so within reason, visual fidelity and flexibility of parameters are more important to us than frame rate.
^ WATER MATERIAL PARAMETERS
The main components are:
- Multiple layers of chunky water shapes
- Wave movement of the geometry
- Foam around shoreline features
We also add some effects in Post Processing:
- Surface sparkles
- A full-screen color gradient
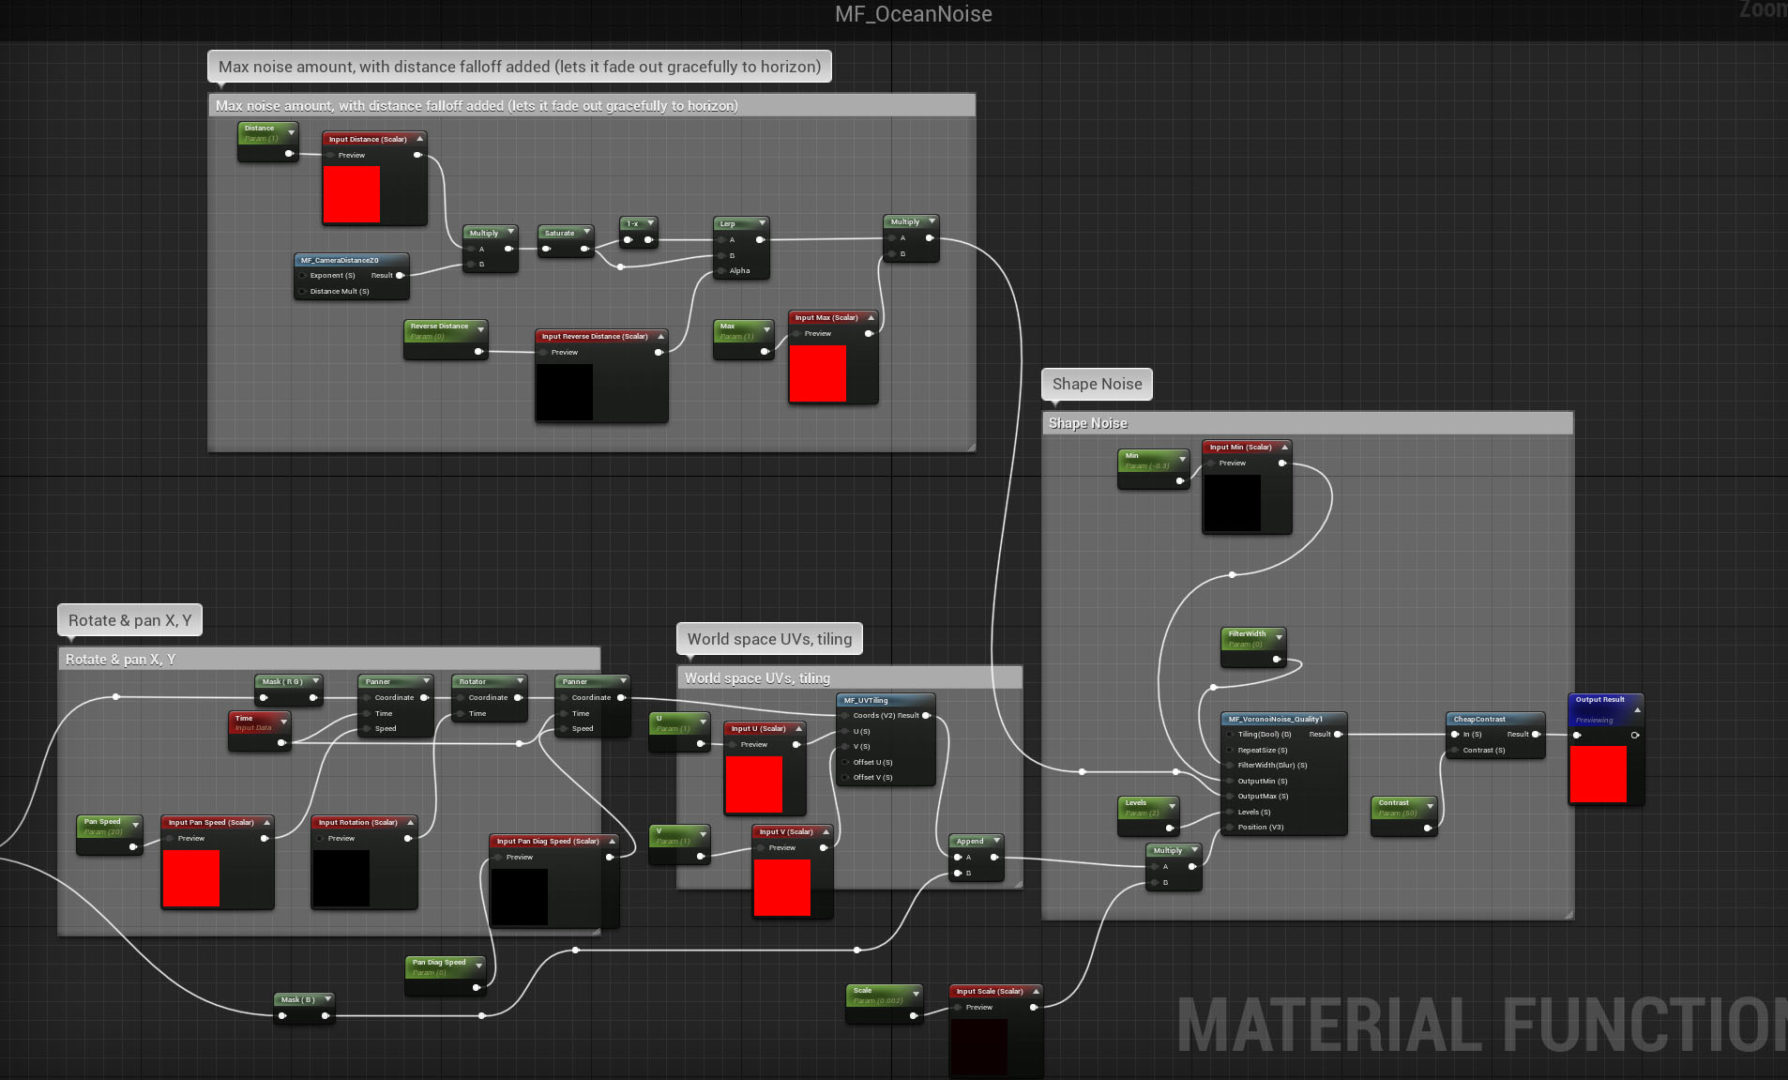
^ OCEAN NOISE MATERIAL NETWORK
/ WATER SHAPES
For the layers of water shapes, I use inverted low level Voronoi noise at very high contrast, which generates pleasant chunky angular shapes very similar to our concepts and the compositing test. Noise in texturing can sometimes look unpleasant and obviously computer generated, but by pushing the contrast we end up with angular shapes that feel more deliberate. Since the noise field is procedural, we also don’t have to worry about texture sizes or repetition. The layers are given a distance-based fade out so that we don’t end up with fuzziness towards the horizon.
^ OCEAN VORONOI SHAPES DEMONSTRATION
At low levels the voronoi noise fields can still give an impression of tiling, so we warp the noise field with another bigger moving noise field to break up the shapes further. This also adds a slow overall movement that reads pleasantly water-like. I hijack the parallax occlusion mapping node to give the layers the illusion of existing at a different depths.
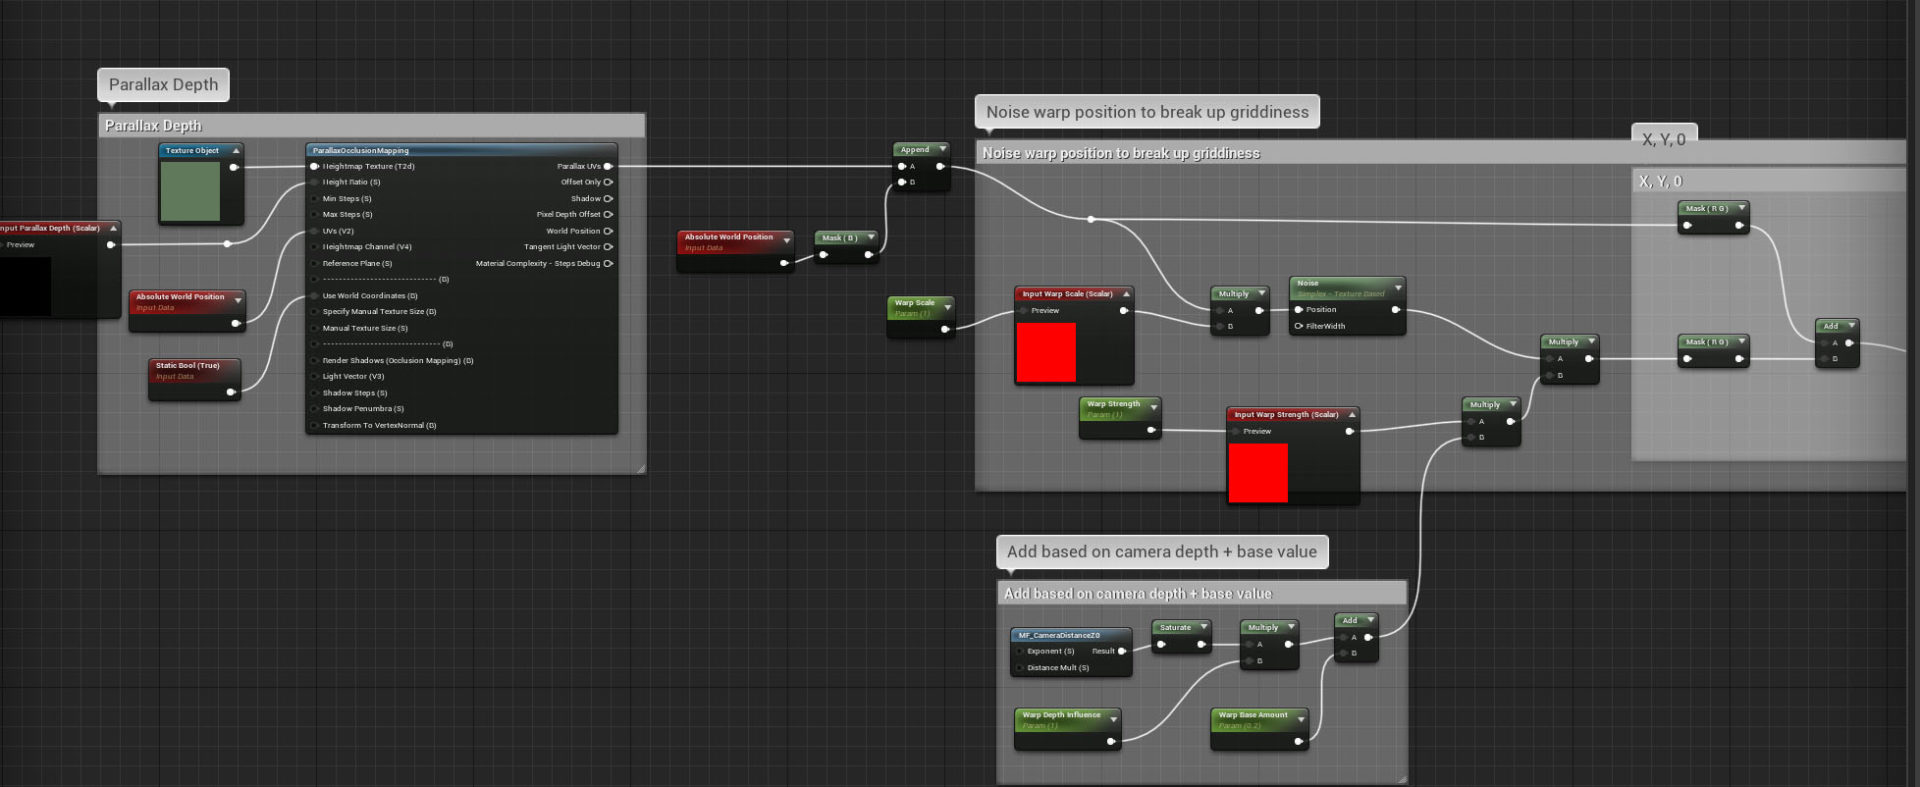
^ OCEAN PARALLAX MATERIAL NETWORK
Lastly we pan the ocean layers at different but similar directions and speeds.
^ OCEAN SHAPE LAYERS
/ GEOMETRY MOVEMENT
A simple Gerstner wave function drives the material world position offset. We could’ve experimented with more complex movement, but a single wave direction worked well enough for our boat chase scenario. The effect is localized around the boats and camera since it doesn’t look great from far away, and we don’t really need it further out since the shader itself already gives a good impression of waviness.

^ VISUALIZATION OF GERSTNER FUNCTION APPLIED TO OCEAN SURFACE
/ SHORELINE FOAM
To create the shoreline foam, we use Distance Fields to get information about areas where the water intersects other geometry. Some procedural bands, moving outwards, work well enough to give the impression of foam within the show’s style, and I add some more liveliness by hijacking the gerstner waves used to deform the water surface, breaking up the shape some more while staying congruent with the wave movement.
^ SHORE FOAM EFFECT BY THERESA LATZKO
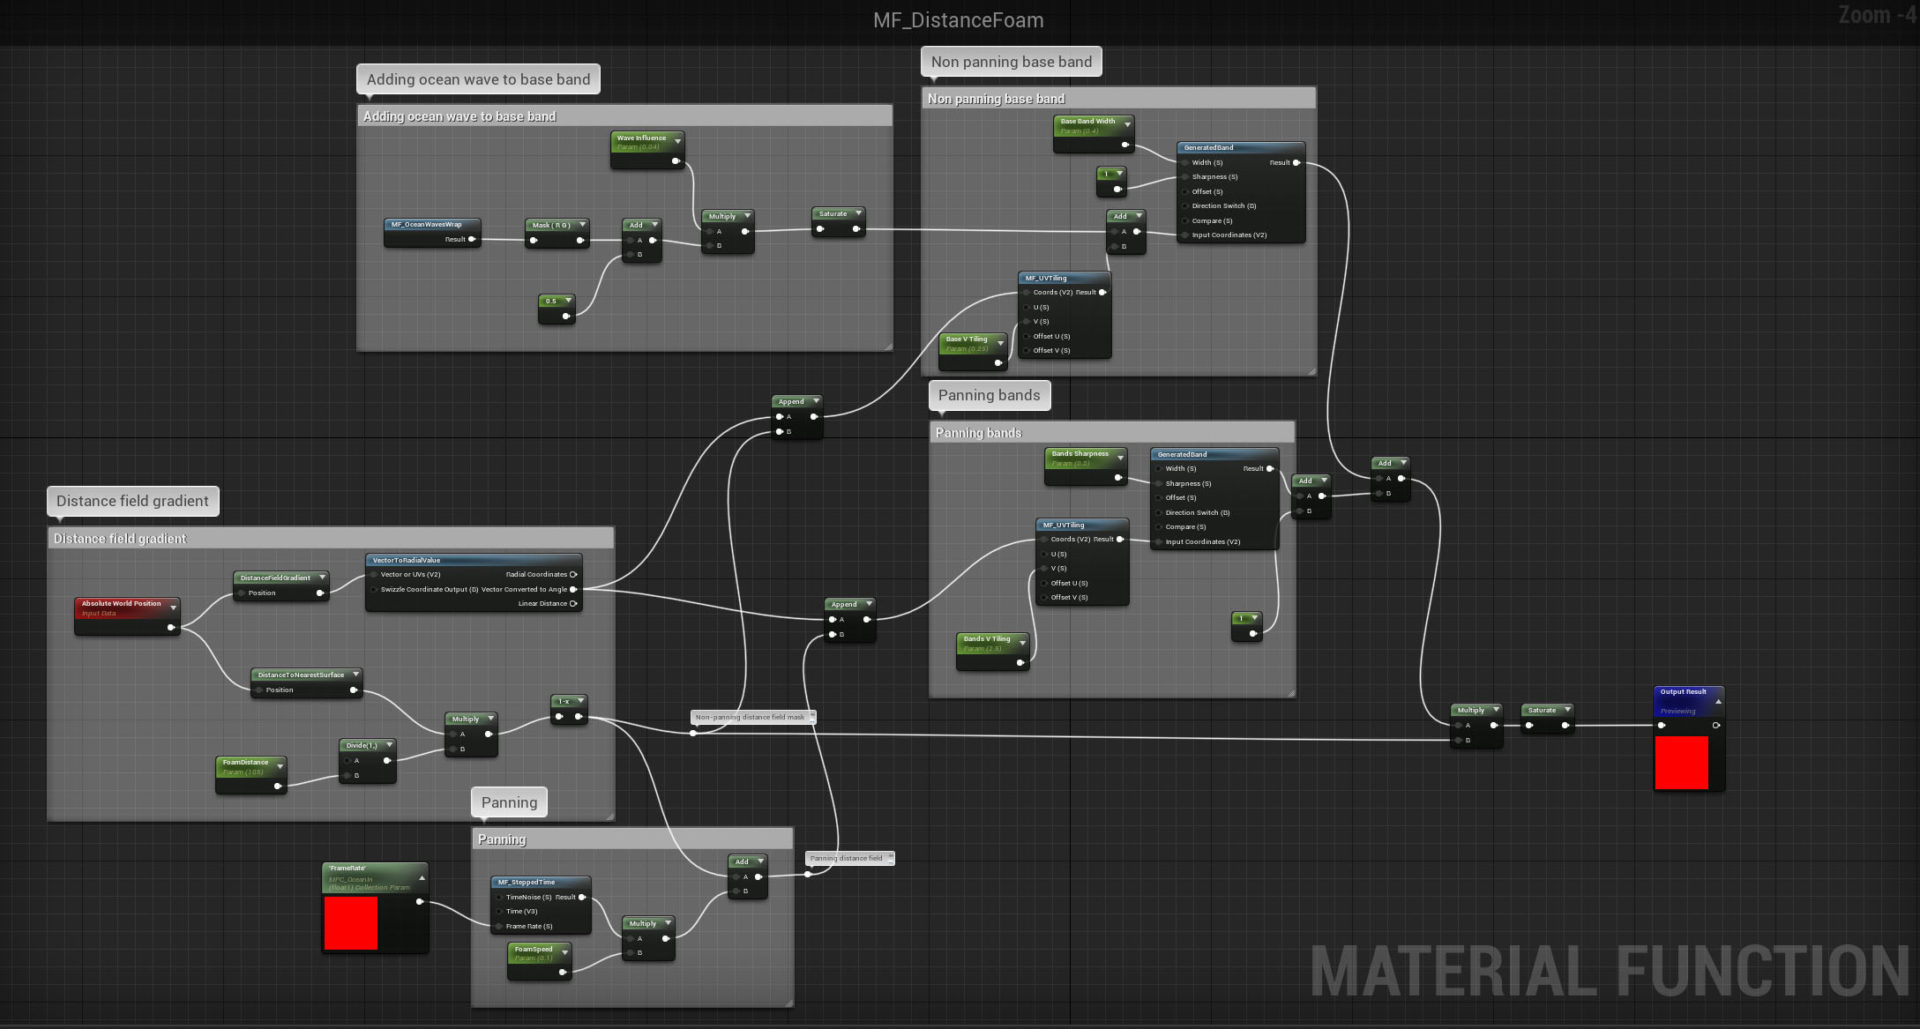
^ SHORE FOAM MATERIAL NETWORK
/ WATER SPARKLES
In a post processing material, we project some more noise at high contrast onto the water surface, and warp it some more for good measure. Since our post processing techniques extract light and shadow, we use the same information to occlude the sun sparkles in shadowed areas.
^ DEMONSTRATION OF WATER SURFACE SHADOW OCCLUSION
/ COLOR GRADIENT
The sparkles are masked based on a sort of fake specularity, a spherical mask that’s projected directly underneath the camera. Lastly we add a full-screen 2D gradient (and give control over it to the lighter). It’s straightforward, helps break up same-ness in surface color and makes a surprisingly big difference.
^ OCEAN SURFACE SPARKLES & GRADIENT
In the next chapter we will wrap up with a look at effects and final thoughts from the team on what we learned from the experience of working in Unreal.
CASE STUDY NAVIGATION:
PART 1: Origins / PART 2: A New Pipeline / PART 3: Designing for Unreal / PART 4: Layout / PART 5: Rigging & Animation / PART 6: The Look / PART 7: Effects & Conclusion
PRODUCTION CREDITSCRÉDITSクレジット
A CHROMOSPHERE Production
EXECUTIVE PRODUCERS
Elizabeth Ito
Karen Dufilho
BASED ON A CHARACTER CREATED BY
Kevin Dart
STARRING
Xana Tang
Piotr Michael
Julie Nathanson
WRITTEN BY
Kevin Dart
Karen Dufilho
Bryan Wolfson
STORYBOARDS
Dashawn Mahone
Jessie Wong
Michael Yates
Eusong Lee
Chris Mitchell
ART DIRECTION
Jasmin Lai
Sylvia Liu
VISUAL DEVELOPMENT
Maxime Dupuy
Benjamin Flouw
Monica Grue
Elaine Lee
Baptiste Lucas
Rebecca Shieh
Lauren Zurcher
Tor Aunet
CHARACTER DESIGN
Keiko Murayama
Linda Fong
Claire Nero
Jojo Park
PROPS & FX
Efrain Farias
Linda Fong
Elaine Lee
Emily Paik
Laura Swalley
Junyi Wu
Lauren Zurcher
COLOR STYLING
Xanthe Bouma
Linda Fong
LEAD ANIMATOR
Tommy Rodricks
ANIMATION
Lauren Hammond
Matt Herring
Natan Moura
Mette Tange
Lauren Adassovsky
Rachel Reid
Taylor Yontz
LEAD COMPOSITOR
Stephane Coedel
COMPOSITING
Simone Ghilardotti
Rob Ward
ANIMATIC EDITING
Stephane Coedel
Eusong Lee
Hugo Morales
TECHNICAL ART DIRECTOR
Theresa Latzko
CG GENERALISTS
Andrew Wilson
Lucy Xue
Katherine Diaz
Shreeya Shetye
RIGGING
Lauren Hammond
LIGHTING & RENDERING
Sharon Lee
Camille Perrin
POST PRODUCTION SOUND SERVICES
Boom Box Post, Inc.
SUPERVISING SOUND EDITOR
Brad Meyer, MPSE
RE-RECORDING MIXER
Kate Finan, MPSE
Jeff Shiffman, MPSE
SOUND EDITORS
Katie Maynard, MPSE
Jessey Drake, MPSE
FOLEY EDITOR
Nate Grady-Reitan
DIALOGUE EDITOR
Xinyue Yu, MPSE
ASSISTANT SOUND EDITORS
Tim Vindigni
Zanne Hanna
RECORDING ENGINEERS
Krandal Krews
Jon Cooper
NATIVE AUDIO – DAN NATHAN
Dialogue Recorded at
SALAMI STUDIOS
LEAD DIALOGUE MIXER
Mark Mercado
ASSISTANT MIXER
Ranen Nowlin
UNREAL ENGINE SPECIAL THANKS
Rob Difiglia
Karen Dufilho
Marc Petit
Alex Paschall
Sam Dieter
Tony Bowren
Matt Oztalay
Mikko Martikainen
Takashi Kuribayashi
Sean Spitzer
Claudette Dwyer
Michelle Blaser
Michael Neely
YUKI 7 THEME
Performed by The Go! Team
Written by Ian Parton
YUKI 7 END THEME
Performed by The Go! Team (feat CHAI)
Written by Ian Parton
The Go! Team appears courtesy of Memphis Industries Ltd
CHAI appears courtesy of Sony Music Entertainment (Japan) Inc.
ORIGINAL SCORE
Boe Weaver
PRODUCTION ART ASSISTANT
Ashley Ma
PRODUCTION SUPERVISOR
Bryan Wolfson
DIRECTOR OF PRODUCTION
Myles Shioda
PRODUCER
Sarah Kambara
CREATIVE DIRECTOR
Kevin Dart
The stories, names, characters and incidents portrayed in this productions are ficticious. No identification with actual persons (living or deceased), places, buildings, and products is intended or should be inferred. No animals were harmed in the making of this motion picture
Copyright MMXXI Chromosphere.
Yuki 7 is a registered trademark of Chromosphere.